Buddy’s Taxonomy Term Suggestion feature helps contributors automatically tag content with relevant SharePoint taxonomy terms based on the content they are creating. This improves content classification, searchability, and governance across your digital workplace.
⚠️ This feature is currently in PREVIEW.
Overview
When enabled, Buddy analyzes the content being created and suggests relevant terms from selected SharePoint term sets. Contributors can then select the most appropriate terms before publishing.
Prerequisites
Before configuring Taxonomy Term Suggestion, ensure:
You have access to the Powell Feature Dashboard
You have Microsoft 365 administrator permissions
A registered application in Microsoft Entra ID
-
Microsoft Graph Application permission:
TermStore.Read.All
Admin consent granted
The Client ID and Client Secret from the Entra application
Step 1 – Activate Buddy in the Feature Dashboard
Go to Feature Management in your Powell administration.
Search for Buddy (Powell Buddy).
Click Manage.
-
Enable the feature:
Toggle Yes
-
Select the appropriate Audience:
Public
Restricted to an AD group
Click Save.
Buddy is now activated.
Step 2 – Enable Taxonomy Term Suggestion (PREVIEW)
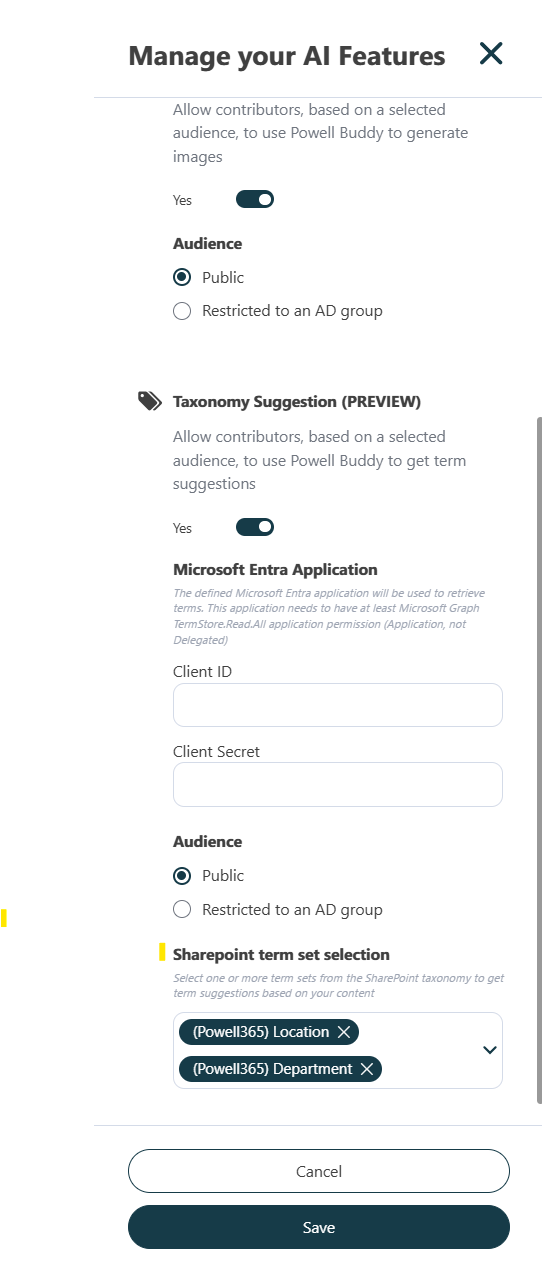
In Manage your AI Features, locate Taxonomy Suggestion (PREVIEW).
Toggle Yes.
Select the audience (Public or Restricted).
Step 3 – Create or Configure Your Microsoft Entra Application
Buddy requires an Entra application to securely access your SharePoint term store via Microsoft Graph.
3.1 Register an Application
If you do not already have an application:
Go to the Microsoft Entra admin center.
-
Navigate to:
Identity → Applications → App registrations
Click New registration.
Give your application a name (e.g., "Powell Buddy Taxonomy").
Register the application.
📖 Official Microsoft documentation:
Register an application in Microsoft Entra ID:
https://learn.microsoft.com/en-us/entra/identity-platform/quickstart-register-app
3.2 Find the Client ID
After registration:
Open your registered application.
-
On the Overview page, copy:
Application (client) ID
This value is your Client ID to paste into Powell.
3.3 Create and Retrieve the Client Secret
-
Inside your app registration, go to:
Certificates & secrets
Click New client secret
Add a description and choose an expiration period.
Click Add
Immediately copy the Value of the secret.
⚠️ Important:
The secret value is only visible once.
Store it securely.
This value is your Client Secret for Powell.
📖 Official Microsoft documentation:
Create a client secret:
https://learn.microsoft.com/en-us/entra/identity-platform/how-to-create-service-principal-portal#add-a-client-secret
3.4 Add Required API Permission
-
In your app registration, go to:
API permissions
Click Add a permission
Select Microsoft Graph
Choose Application permissions
-
Add:
TermStore.Read.All
Click Grant admin consent
📖 Microsoft Graph permission reference:
https://learn.microsoft.com/en-us/graph/permissions-reference#termstore-permissions
Only Application permissions are supported (not Delegated).
Step 4 – Configure Buddy in Powell
In Powell:
-
Enter:
Client ID
Client Secret
Select the SharePoint term sets that Buddy should use.
Click Save.
Only selected term sets will be analyzed for AI suggestions.
Contributor Experience
Once configured:
A contributor creates content using Buddy.
Buddy analyzes the content.
It proposes relevant taxonomy terms from the selected term sets.
-
The contributor can:
Accept suggested terms
Remove suggestions
Add additional terms manually
Content is published with structured metadata.
Benefits
Increased metadata consistency
Improved content discoverability
Reduced manual tagging
Governance alignment with SharePoint taxonomy
Secure Microsoft Graph integration
Security & Governance Notes
Access can be restricted to specific AD groups.
Only selected term sets are exposed.
The Entra application uses Application permissions only.
Client secrets must be stored securely and rotated according to your security policy.
If needed, your Microsoft 365 administrator can handle the Entra application setup following the official Microsoft documentation referenced above.